The Detailed Ways of Removing Green Screens in Photoshop
Green screen removal is a basic photo and video editing process actively used to manufacture professional-looking images for creative endeavors, promotions, or even individual capacity. Well, if you were wondering how to remove green screen in Photoshop, you have come to the right article! Photoshop is also one of the most powerful editing programs and has multiple ways to cut out a green screen accurately and flexibly. This skill can take your editing game to the next level. We will offer step-by-step instructions on removing green screens in Photoshop with different methods to ensure you can select which method works best for you and your experience level. If Photoshop’s tools seem a little complex or time-consuming for some, we will also show you a much simpler alternative: Picwand AI Photo Cutout. You can then use this knowledge and tools to remove any green screen.
Contents:
Part 1. How to Remove Green Screen in Photoshop
Photoshop is a strong editing tool that creates professional, fluid images. It has precise tools for editing films, product photos, and creative work. They ensure flawless results. Let's look at how it works and some methodical techniques to get rid of green screens.
Features of Photoshop for Removing Green Screen
◆ It allows you to refine edges and adjust transparency for perfect cutouts.
◆ Targets specific colors, like green, to isolate and remove the background.
◆ Offers non-destructive editing, making adjustments easy and reversible.
◆ Smooth edges for natural blending with new backgrounds.
Different Ways to Remove Green Screen in Photoshop
Method 1: Color Range Tool
This method is best for quickly removing the green screen by selecting specific colors in your image. It’s efficient and perfect for pictures with a uniform green background.
Step 1. Open your image in Photoshop.
Step 2. Select Color Range from the select menu.
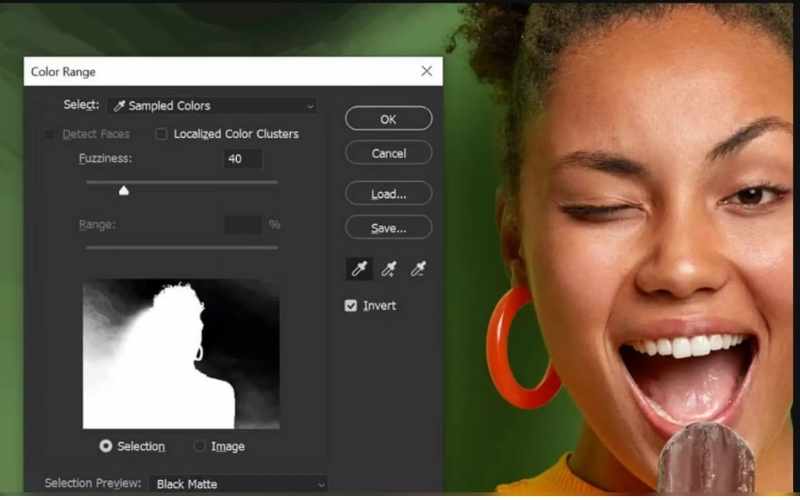
Step 3. Click on the green screen in your image to select it. Adjust the Fuzziness slider to refine your selection.

Step 4. Click the Ok button and the green screen will be selected. To remove the green background, hit Delete or add a Layer Mask.
Method 2: Select and Mask the Tool
This method is best suited for more complex projects. It gives precise control over edges and transparency. This ensures a clean, professional finish.
Step 1. Open your image and duplicate the layer for backup.
Step 2. Drag the Quick Selection Tool over the green screen to choose it after choosing it from the toolbar.
Step 3. Click Select and Mask from the top menu.

Step 4. Use the Refine Edge Brush to clean up rough edges, then choose Output to New Layer with Mask. Apply the changes and the green background will be removed.
Method 3: Manual Removal with Eraser Tools
It is a hands-on approach that works well for users who prefer full control, especially for images with intricate details or inconsistent green backgrounds.
Step 1. Open your image and create a duplicate layer. Select the Eraser Tool from the toolbar.
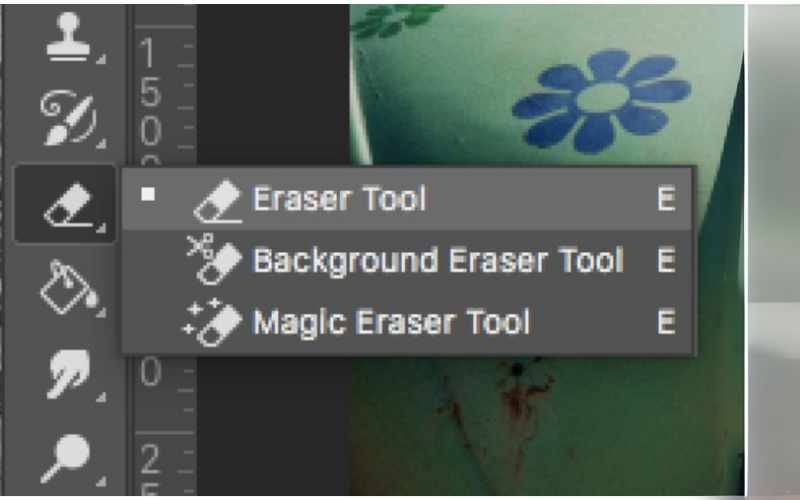
Step 2. While zooming in, carefully remove the green backdrop by hand. Adjust the eraser's size and hardness as necessary for accuracy.
These methods ensure you can remove green screens in Photoshop. They work for both automated tools and manual techniques.
Part 2. Best Alternative to Remove Green Screen
Photoshop is great for removing green screens. But, it can be hard for beginners and slow for quick fixes. If you want a faster, more user-friendly solution, Picwand AI Photo Cutout is available. Powered by artificial intelligence, it streamlines the process and gives you clean, professional results in just a handful of clicks. However, Picwand provides a straightforward solution with no loss of quality. We will review its features. Then, we will give step-by-step guidelines to help eliminate green displays.
Main Features
◆ Automatically detects and removes green screens with precision.
◆ Intuitive design is suitable for beginners and professionals alike.
◆ Removes backgrounds in seconds, saving time on editing.
◆ Compatible with JPEG, PNG, and other common image formats.
◆ Allows fine-tuning of the cutout edges for a polished result.
◆ No need to download software, and it works directly in your browser.
Detailed Steps to Remove Green Screen with Picwand AI Photo Cutout
Step 1. Open your browser and visit the Picwand AI Photo Cutout tool's official site.
Step 2. Select the image with the green screen and click the Upload Image option to make the desired changes.
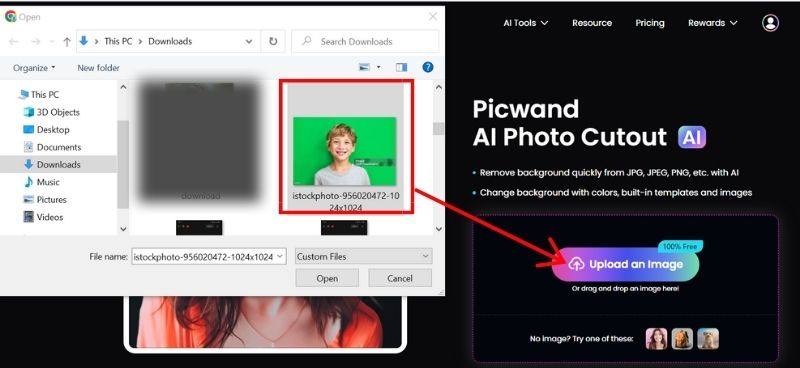
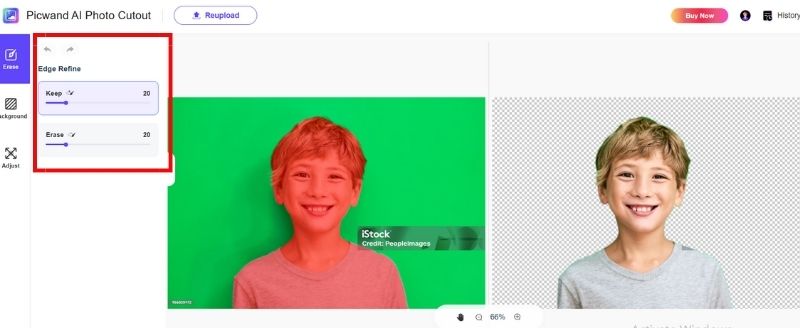
Step 3. Once the image is uploaded, the AI automatically detects and removes the green screen. This process takes only a few seconds.
Step 4. You can use the correction tools to smooth out the edges or eliminate any last traces of green tint. (Optional)
Step 5. Hit the Save button to save your modified image without a green screen.

Picwand AI Photo Cutout’s combination of speed, simplicity, and precision makes it an excellent choice for professional-looking results without the complexity of advanced editing software.
Part 3. FAQs about Remove Green Screen in Photoshop
Is Photoshop the best way to remove the green screen?
Free Green Screen Removal Tool Online allows you to select a giant green screen and a small amount of green screen to remove the background. It is very functional, providing accuracy and versatility for more complex edits. Alternatives like Picwand AI Photo Cutout could help with quick, basic edits.
Is Photoshop available on all devices?
Photoshop is primarily available on desktops (Windows and macOS). Adobe also offers Photoshop Express, a lighter version for mobile devices. It has limited features for removing green screens.
How do I deal with intricate details like hair when removing a green screen?
The Refine Edge Brush within the Select and Mask Tool is the best option for intricate areas like hair or fur. This tool preserves fine details while accurately removing the green screen.
What do I do if part of my subject matches the green screen color?
If your subject has green tones similar to the background, use the Lasso Tool or the Quick Selection Tool to isolate the subject manually before removing the green screen. It will ensure it removes the background.
What are some common mistakes to avoid when removing a green screen?
Overusing the Eraser Tool which can result in jagged edges. Forgetting to refine edges, leading to visible green outlines. Using low-quality images with shadows or uneven lighting.
Conclusion
Mastering how to remove green screen in Photoshop unlocks creative possibilities with precise tools like Color Range and Select and Mask. Photoshop offers professional-grade features for detailed green screen removal, perfect for advanced users. For a faster, beginner-friendly option, try Picwand AI Photo Cutout. It is an AI-powered tool that cuts out photos. Both methods meet different needs. They let you remove and replace backgrounds easily. Choose the tool that best suits your expertise and project requirements.
AI Picwand - Anyone Can be A Magician