3 Expert Methods to Compress Images in PowerPoint [Solved]
PowerPoint compress images functionality is a valuable approach for minimizing image sizes while preserving acceptable quality within presentations. This allows users to optimize presentations for sharing through Email or online platforms. This way, it will have a smoother performance and faster downloads. In this blog post, you will discover the tools and techniques available to compress images in MS PPT. This way, we can help you optimize your presentations without compromising quality.
Contents:
Part 1. How to Compress Images in PowerPoint
Large presentations can be inconvenient to share, particularly through Email or online platforms with size limits. Fortunately, Microsoft PowerPoint comes with several built-in tools to compress images. Compression options include deleting cropped areas of pictures and choosing preferred resolutions. Users can choose specific compression for various use cases, like High fidelity, HD, Print, Web, and Email. Some of the image formats you can import are JPG/JPEG, PNG, TIF/TIFF, BMP, HEIC/HEIF, and more.
Here’s how to compress picture in PPT:
Step 1. Insert the picture you want to compress in PowerPoint.
Step 2. Select the image by clicking it to open the Picture Format tab.

Step 3. In the Picture Format tab, click Adjust to open the Compress Pictures box.

Step 4. You will see several compression options within the Compress Pictures box:
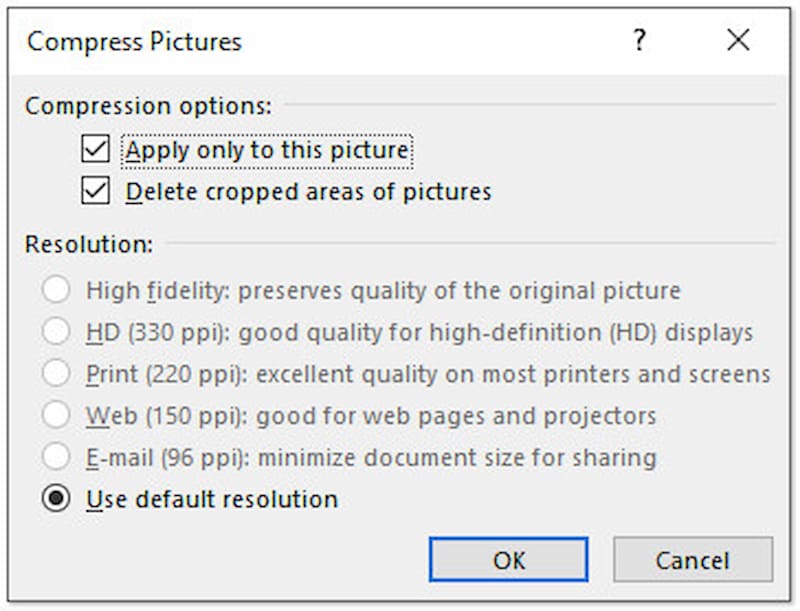
◆ Apply only to this picture: Checking this box compresses only the selected image. Meanwhile, leaving this box unchecked compresses all images in the presentation.
◆ Delete cropped areas of pictures: Checking this box will remove the cropped-out areas of images, which can help reduce file size.
◆ High fidelity: Keeps the highest quality but may not reduce file size.
◆ HD (330 ppi): Perfect for high-definition displays or screens.
◆ Print (220 ppi): Ideal for printed documents with good quality.
◆ Web (150 ppi): Best for web pages, online sharing, and projectors.
◆ Email (96 ppi): Suitable for sharing attachments and lowest file size.
Step 5. Choose the appropriate options according to your preference, then click OK.
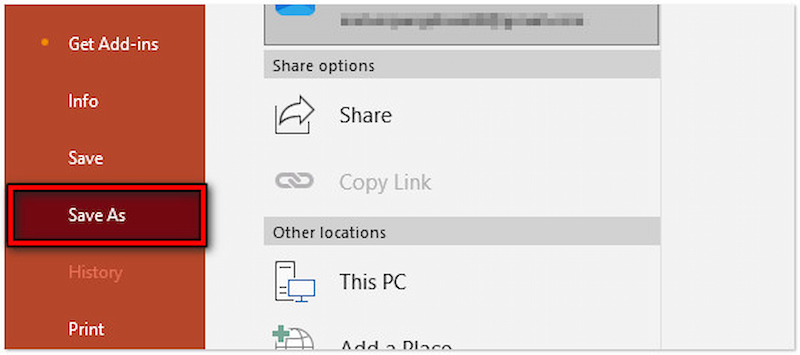
Step 6. After applying the compression, navigate to File and select the Save As option.
PowerPoint offers various image compression options that are easily accessible within the application. Reducing image sizes doesn’t require users’ extensive knowledge. But here’s a thing: Selecting the Email (96 PPI) to compress images in PPT can result in noticeable quality loss. This might not be ideal for presentations that require high-quality visuals.
Part 2. Compress Pictures With PowerPoint Alternatives
Picwand Online Image Compressor
Large, high-resolution photos can slow down PowerPoint presentations, making it sluggish to navigate between slides. At this point, let’s proceed with our first alternative to compress photos in PowerPoint. Picwand Online Image Compressor is a highly effective web-based tool that offers a straightforward solution to compress image file sizes. It supports various image formats supported by PowerPoint, such as JPG/JPEG, PNG, GIF, BMP, SVG, etc.
Not to mention, Picwand Online Image Compressor uses smart AI compression to algorithms. This makes compression hassle-free as it automatically optimizes images while keeping the best quality. But what makes it truly unique is that you can process up to 40 images at once. This can be beneficial for those who need to compress multiple files quickly. The tool ensures you can still get high-quality results even if you process multiple images.
What to Expect With Picwand Online Image Compressor:
◆ An AI-powered tool that uses advanced compression algorithms.
◆ Can handle various image formats like JPEG, PNG, WebP, etc.
◆ Supports simultaneous compression for processing up to 40 images.
◆ Compresses photos for presentation while keeping the original quality.
Here’s how to compress photos in PPT using Picwand Online Image Compressor:
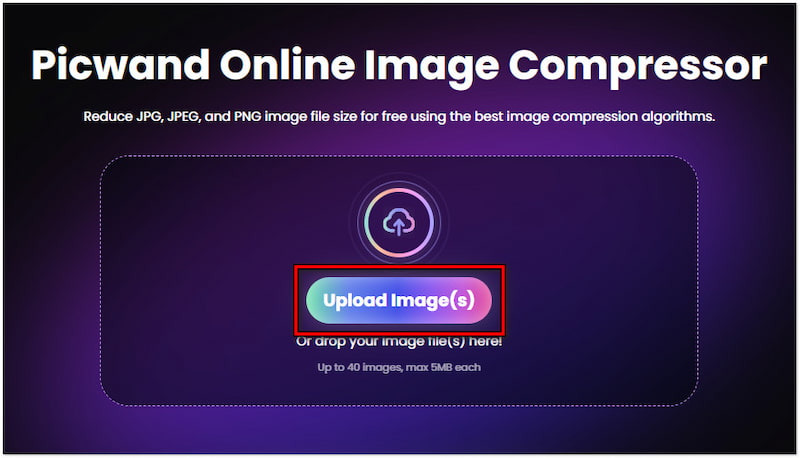
Step 1. Direct your browser to the official Picwand Online Image Compressor website
Step 2. On the Picwand homepage, click Upload Image(s) to import the photos for compression. You can use the drag-and-drop functionality to add images from online sources.
Step 3. Once the photos are added, Picwand Online Image Compressor will analyze and apply the compression. You can then sit back and wait for the process to finish.

Step 4. After Picwand Online Image Compressor applies the compression, click Download All. A ZIP folder containing all the compressed photos will be downloaded to your computer.

Picwand Online Image Compressor offers a convenient solution for compressing multiple photos for your presentation. It provides a fast compression process, allowing you to optimize image file sizes quickly. This makes it a valuable tool if you need a speedy solution.
Adobe Photoshop
Pictures with high resolution can cause issues with printers, like slow processing times or, worse, printing errors. If you want to reduce image size while keeping the best quality possible, then Adobe Photoshop can be a solution. It is known for being a powerful image editing and manipulation software. Using the Save for Web dialog box, users can configure the compression settings for JPEG, PNG, and GIF formats. The Save for Web dialog box includes options to configure pixel dimensions and reduce colors.
Here’s how to compress pictures in PowerPoint using Adobe Photoshop:
Step 1. Open the picture you want to reduce size in Adobe Photoshop.
Step 2. Locate the Image option and select Image Size to adjust the pixel dimension.
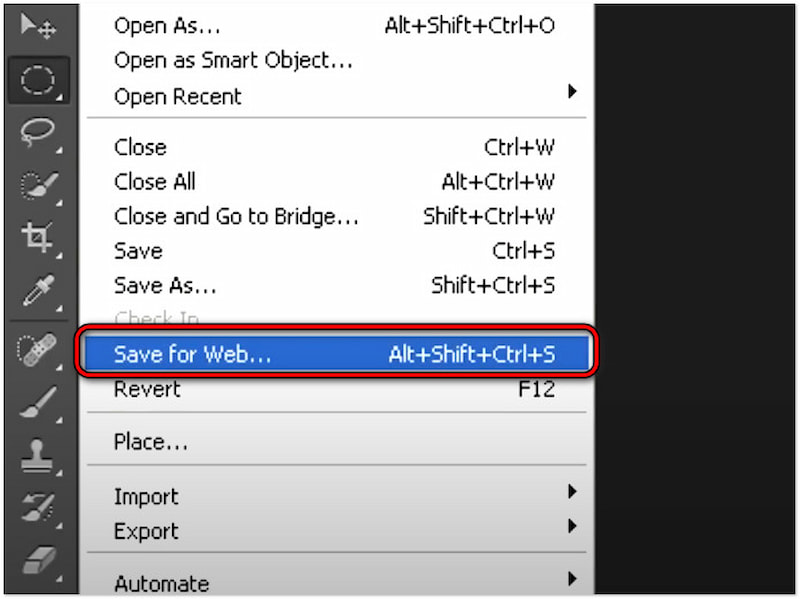
Step 3. Move to the File tab and select Save for Web to open a dialog box.
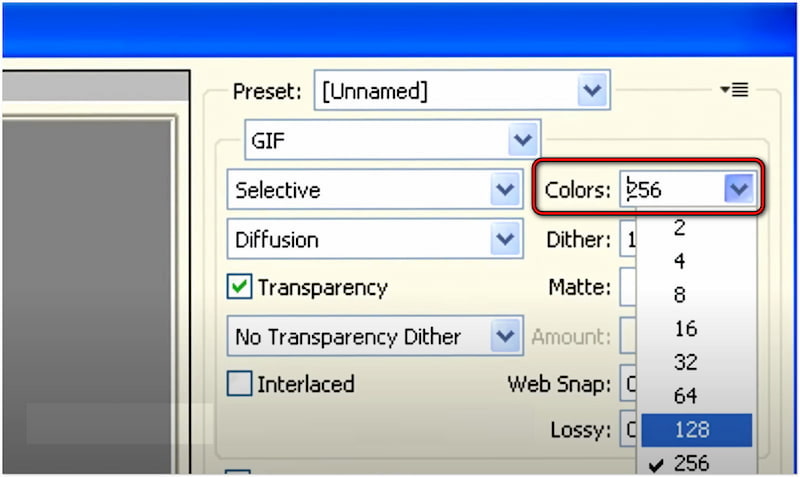
Step 4. In the dialog box opened, select the Colors field and change the option to 128.
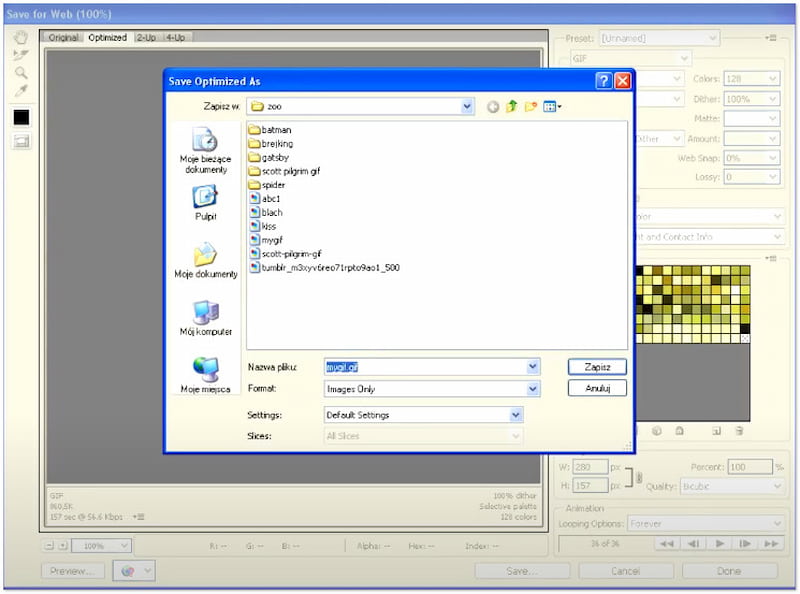
Step 5. Afterward, select Save, name your compressed picture, and choose JPEG.
Adobe Photoshop is a notable program for image editing and manipulation. It also lets you convert low-quality images into higer-quality file. However, some users find it complicated to navigate, particularly beginners. Besides, it is included in the Adobe Creative Cloud meaning it requires a subscription to access the program.
Part 3. FAQs about Compressing Images in PowerPoint
Can you compress all images in PowerPoint at once?
YES! You can compress multiple images in PowerPoint. Simply press Ctrl+A/Cmd+A to select all images and follow the instructional guides provided. Compressing a single or multiple photos in PowerPoint shares the same steps.
How to compress images in PowerPoint 365?
Compressing images in PowerPoint 365 is a straightforward process. You can follow the instructional guide provided for the procedure. PowerPoint 365 and another version of it share the same steps, so you don’t have to worry.
How to compress images in PowerPoint on Mac?
Start by opening the presentation containing the images. Press the Cmd+A keys to select all the images you want to compress. Afterward, click Format and click Adjust to open the Compress Pictures dialog box. Select your desired compression and click OK to apply it.
Summary
Knowing how to compress images in PowerPoint is crucial for those looking to create efficient, high-quality presentations. Microsoft PowerPoint provides built-in compression features, allowing users to reduce file sizes but with slightly compromised results. Fortunately, tools like Picwand Online Image Compressor are available for such purposes. It ensures that the images you will use in your presentation are well-optimized while keeping the best quality. So, if you want to make your presentation smooth and faster to load, consider compressing image file sizes first using the methods from this post.
AI Picwand - Anyone Can be A Magician