How to Downsize Pictures on iPhone Without Losing Quality
Nowadays, our smartphones serve as our primary cameras. Undoubtedly, photos from the iPhone camera are consistently clear and sharp. However, these clear and sharp photos consume a lot of storage space. If you’re in search of freeing up your storage space, sharing your photos trouble-free, or meeting a specific file size requirement, we’ve got you! Fortunately, there are various methods and tools readily available on the iPhone to reduce photo sizes. In this blog post, you will learn how to downsize pictures on iPhone without affecting too much quality. From using built-in options to utilizing third-party solutions, we will walk you through the best ways to downsize your photos on your iPhone.
Contents:
Part 1. How to Reduce Photo File Size on iPhone With the Best Online Tool
Reducing photo file sizes on an iPhone can benefit you by saving storage space. That being said, you can use Picwand Online Image Compressor for this purpose. As the name suggests, it is a web-based tool that serves as a magic wand to reduce image size on iPhone. It uses lossless AI compression algorithms to optimize your images while keeping the best quality. This means you can still get high-quality results even if the photo is compressed.
Accessible through any modern browser, it lets you upload your images directly from your iPhone. For good measure, Picwand Online Image Compressor can handle various image formats. This includes iPhone-supported JPEG and formats like PNG, WebP, GIF, SVG, etc. But what makes it truly stand out is its simultaneous compression. It lets you upload up to 40 files and reduce image size at once. This tool is useful for quick, on-the-go photo compression.
Why Consider Using Picwand Online Image Compressor:
• Employs lossless smart AI compression algorithms.
• Reduces image file sizes while keeping the original quality.
• Supports batch compression, allowing uploading of up to 40 images.
• Handles commonly used image formats like JPEG, PNG, WebP, etc.
Here’s how to reduce photo file size on iPhone using Picwand Online Image Compressor:
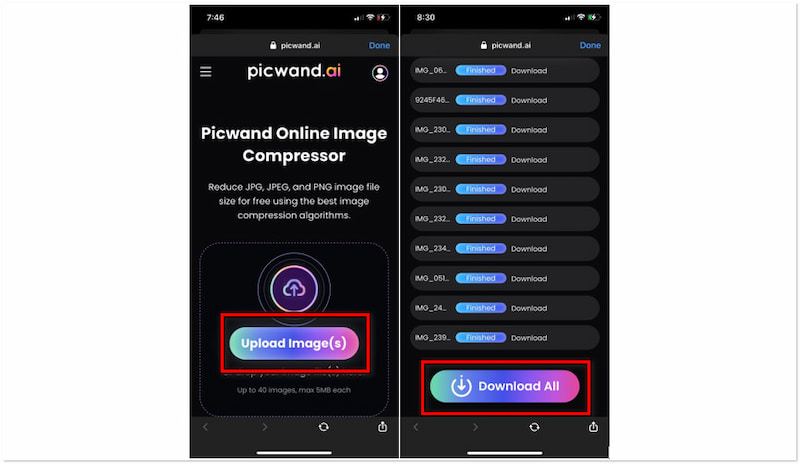
Step 1. Access the official Picwand Online Image Compressor website on your iPhone.
Step 2. Tap the Upload Image(s) button to select the photos you want to reduce file size. As mentioned, you can select up to 40 image files from your camera roll.
Step 3. After adding the photos, Picwand Online Image Compressor will initiate the compression. Sit back while waiting for the compression algorithm to finish the process.
Step 4. Once the compression process is complete, tap the Download All button. Your iPhone will download a ZIP folder containing the compressed photos.
Picwand Online Image Compressor can be your lifesaver when you need a downloadable, smaller-sized version of your photos. It ensures images are well-optimized and reduced in size by up to 90%, all without quality loss.
Part 2. How to Compress Photos on iPhone Using a Camera
Undoubtedly, the iPhone can capture high-quality images. However, large picture sizes can quickly use up storage space on the iPhone. Besides, it won’t be easy to send them through iMessage or Mail. Fortunately, the iPhone’s camera settings provide a built-in option to compress photos. By default, iPhones use the HEIF format for photos, which provides better compression than JPEG. Using this format can save you lots of storage space on your iPhone.
Here’s how to compress photos on iPhone using Camera settings:
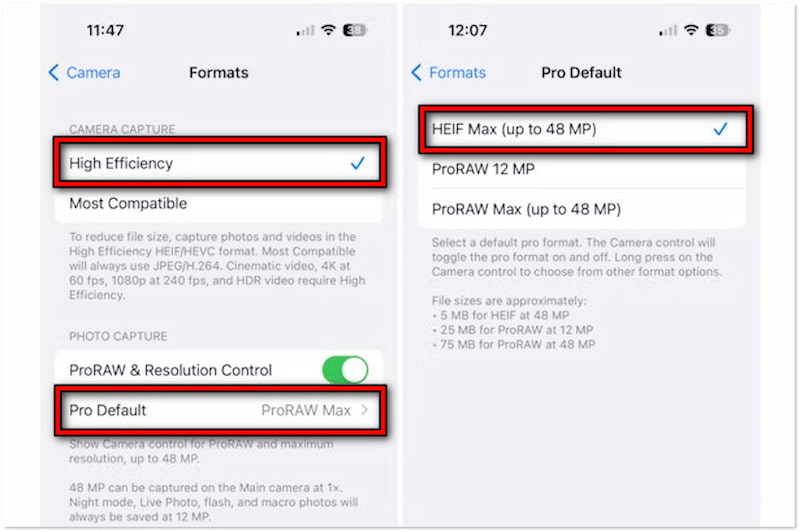
Step 1. Access the Settings app and look for the Camera option.
Step 2. In the Camera settings, tap Format and choose High Efficiency.
Step 3. Optionally, tap Pro Default and select HEIF Max (up to 48 MP).
Note: The HEIF format provides the smallest photo size without reducing quality. In addition, choosing the HEIF Max (up to 48 MP) option will further reduce the picture size. This option limits the size of your photo to approximately 5 MB.
Part 3. How to Shrink a Photo on iPhone Via Mail
The iPhone’s Mail app offers a convenient solution for shrinking photos before sending them. When a photo is attached to an email, the app provides various options to reduce the file size. Options include Small, Medium, Large, and Actual Size. Choosing the Small option can significantly reduce the picture’s dimension and resolution. This can be beneficial if you need to share photos right away and have no time to use compression tools.
Here’s how to shrink a photo on iPhone via the Mail app:
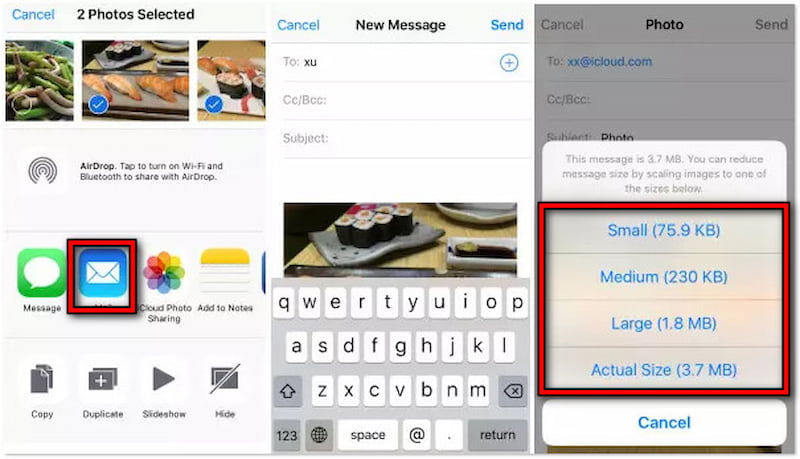
Step 1. Navigate to Photos to select the images you want to compress and send.
Step 2. After selecting the photos, tap Share and select Mail from the available options.
Step 3. Enter your recipient’s email address and subject, and compose any message if needed.
Step 4. Once the photos are attached, a prompt will appear, offering different size options.
• Small: Photo size is significantly reduced, ideal for fast sharing.
• Medium: Photo size and quality are balanced for general use.
• Large: High-quality photos with minimal compression.
• Actual Size: Photos maintained in their original resolution and size.
Step 5. Tap your preferred size to send it automatically to your recipient.
The iPhone’s Mail app offers a straightforward process to shrink the size of your photos. This method lets you swiftly optimize photo file sizes, making it easier to share photos without consuming excessive data.
Part 4. How to Make a Photo Smaller on iPhone With WhatsApp
WhatsApp is a well-known messaging app that facilitates instant communication. But many didn’t know that this app automatically makes a photo smaller when they send it. Not to mention, sending an image using the app reduces the picture file size to share it quickly. In addition, it will be easier on the recipient’s end to download the sent photos.
Here’s how to make a photo smaller on iPhone with WhatsApp:
Step 1. Select the message where you want to send the compressed photo.
Step 2. Tap the Paperclip icon to select the photo you want to send.
Step 3. Tap the HD option to adjust the file size and select Standard Quality.
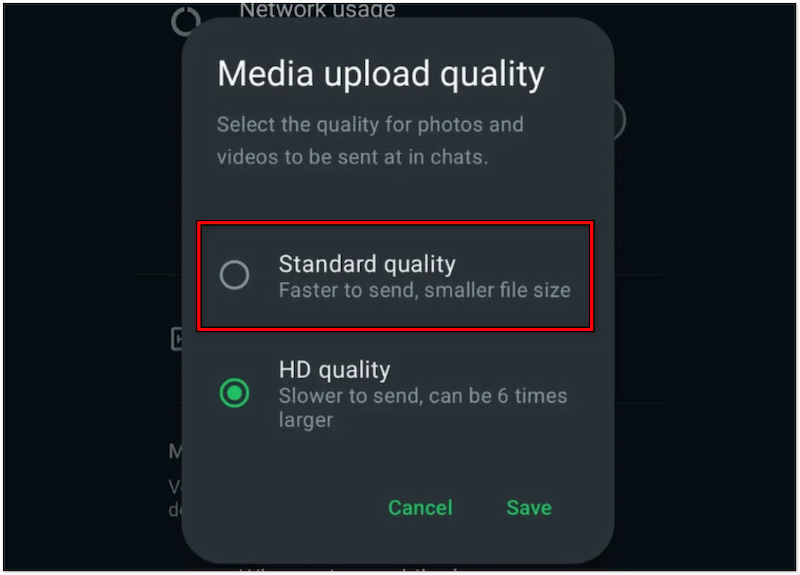
WhatsApp offers a hassle-free way to make image compression. It allows for saving mobile data and storage space from both ends. However, this process lowers the resolution and quality of the photos. Still, the photo’s clarity is good enough for everyday use.
Part 5. FAQs about Downsizing Pictures on iPhone
How to reduce photo file size on iPhone 14?
Reducing photo file size on iPhone 14 is a bit complicated compared to the methods we presented. Start by going to Photos and select the image you want to reduce size. In the photo opened, tap the Share icon and select the Save to Files option. Navigate to the folder where you saved the photo then tap the Three Dots icon. Choose the Convert Image option, select JPEG, and tap Small to save the reduced file.
Which app is used for reducing image size on iPhone?
There are several apps you can use to reduce image size on iDevices. Usually, these apps allow you to resize your photos to specific dimensions and quality. If you’re not into downloading apps, you can consider using online tools like Picwand Online Image Compressor. This online tool lets you compress image file sizes without losing quality. In addition, you don’t need to install any apps on your iPhone.
What is the best tool to resize a photo on an iPhone to passport size?
The App Store offers various applications to resize your photo to passport size. One app you can utilize is the ID Photo DIY, which is designed to create passport-size photos. It allows you to crop your photos to the exact dimensions, such as 2×2 inches or 51×51 mm. However, you may notice the quality is slightly degraded when you crop the photo. But worry not, you can increase photo resolution using another app or online tools.
Summary
Understanding how to downsize pictures on iPhone can benefit you in several ways. It is a practical solution to manage your storage space and ease the sharing of photos. We present you with various approaches to accomplish this task. Built-in options like camera settings and Mail provide convenient file optimization. Third-party solutions like Picwand Online Image Compressor offer an efficient way to downsize your pictures on your iPhone. It ensures that your photos are well-reduced while maintaining the original quality. These methods help you save space and ensure that your photos are suitable for various purposes. Mastering these approaches ensures that your iPhone remains an efficient tool for capturing photos.
AI Picwand - Anyone Can be A Magician
