3 Simple Methods to Compress Photos on Your Mac
This article covers three helpful methods to compress an image on Mac. Whether you want to reduce the file size of your Mac photos for specific platform requirements, faster transfer and uploads, saving storage space, or other reasons, you can pick your preferred image compressor to do that.
Contents:
Part 1. Built-in Preview Tool to Compress an Image on Your Mac
For various purposes, you may want to adjust image MB on your Mac. As mentioned above, you can reduce the image file size for sharing, sending, or loading quicker, improving user experience and saving storage space. Whatever the reason, when you need to compress an image on a Mac, you can start with its built-in Preview app.
Step 1. Locate the image file you want to compress on your Mac and right-click on it. Choose the Open with option and use Preview to open it. By default, you can also double-click the photo to open it directly in the Preview application.
Step 2. Click the top Tools menu and select the Adjust Size function. You can freely change the dimensions to compress a picture on your Mac.
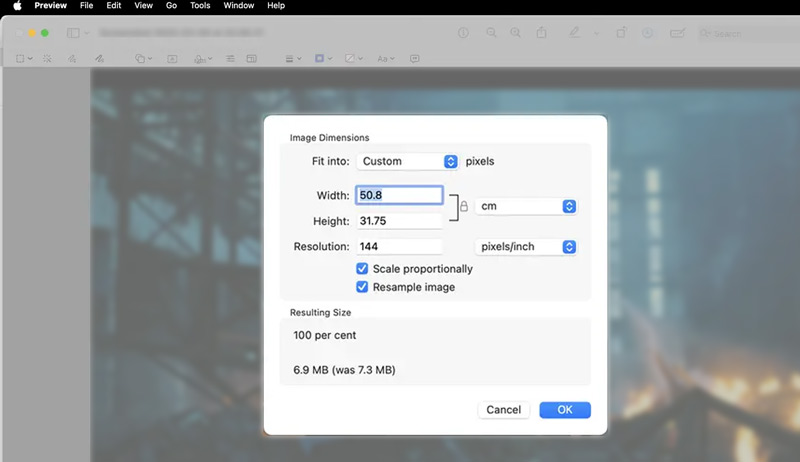
Step 3. Go to the File menu and choose Export. Select the desired output format for the image file. You can select a lower-quality setting to shrink the file size of your picture. Click the Save button to confirm the image compression operation.
Part 2. How to Compress an Image on Mac Using Picwand
To quickly compress photos on a Mac while keeping their source image quality, you can use the AI-powered Picwand Online Image Compressor. Thanks to the advanced image compression algorithms, this user-friendly tool lets you compress photos on your Mac without sacrificing quality. It can reduce the file size of images in JPEG, JPG, PNG, TIFF, HEIF, BMP, and other formats.
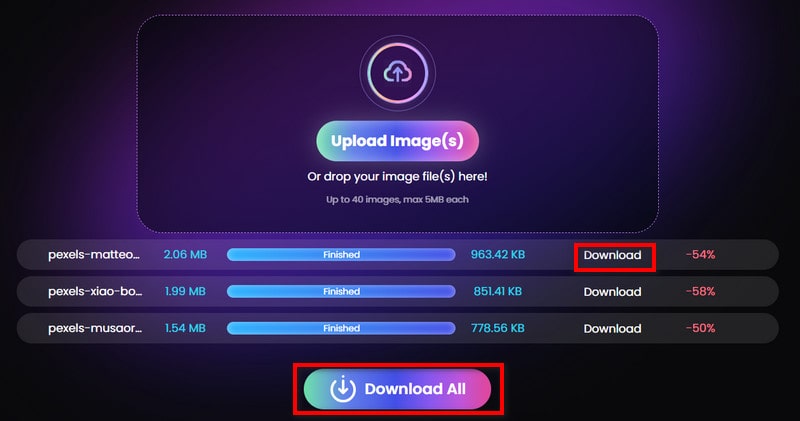
Step 1. When you need to adjust image MB on a Mac, navigate to the online image compressor website and upload your pictures. As you can see, it enables you to compress multiple photos at once, even up to 40 images.

Step 2. Once your image files are uploaded, Picwand will automatically compress them using AI. It can balance the source picture size and image quality to control the compression level. Click the Download button to save the compressed images on your Mac.
Besides the introduced Picwand, there are several other easy-to-use online tools that can help you compress images online on different devices. Some popular image compressors include FreeConvert Image Compressor, Image Resizer, iLoveIMG Compress IMAGE, and TinyPNG.
You can select a preferred tool, upload your image(s), and then start the online compression with ease. These web-based image compressors provide a straightforward to compress photos on your iPhone, Mac, Windows PC, and Android devices. But you should know that some of them come with some limitations.
Part 3. How to Compress a Picture on Your Mac in Adobe Photoshop
When it comes to image compression and editing, you may easily think of the powerful Photoshop. As an all-featured image editing tool, Photoshop does allow you to compress an image on your Mac. It offers several helpful tools for you to reduce the file size of your pictures.
Photoshop offers a 7-day free trial for you to access all its functions. You can download the latest Mac version from the official Adobe website and follow the steps below to compress your pictures in Photoshop.
Launch Photoshop on your Mac and add the image file you want to compress. To compress a picture, you can go to the Image menu and use the Image Size feature. You are allowed to freely shrink the width and height of the image to decrease its file size. Also, you can lower the image resolution to reduce the file size.
To compress photos in Photoshop, you can also rely on the Save for Web function. Open your picture in Photoshop and click the top File menu. Go to Export to select the Save for Web (Legacy) option.
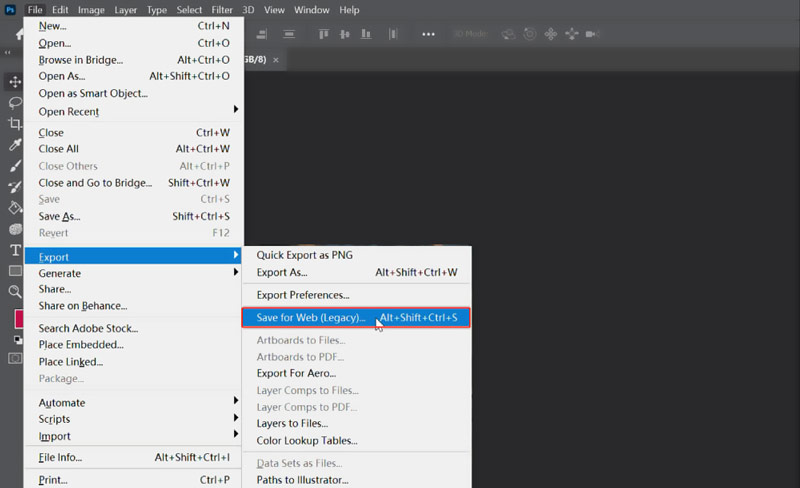
In the pop-up window, you can select the desired format for your compressed image and adjust various related settings. You can drag the Quality slider to control the level of compression. Moreover, it enables you to directly enter width and height pixels to resize the image. Shrink the image to your preferred size and then save the changes.
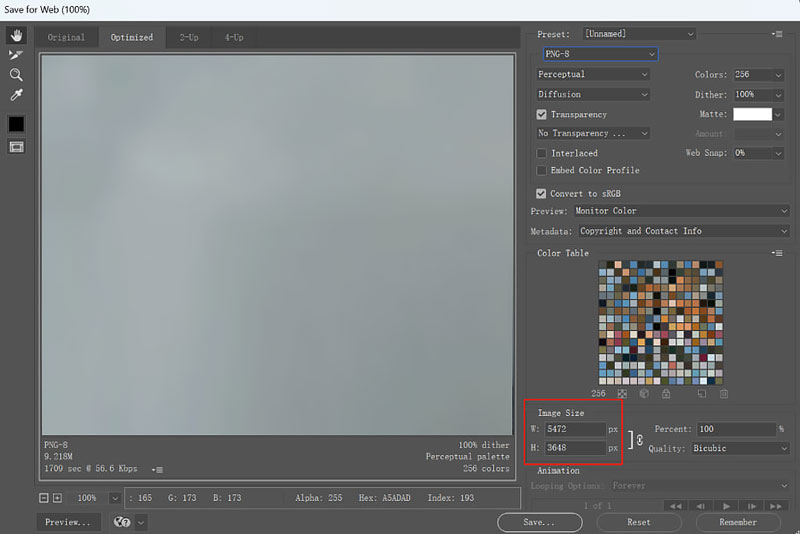
When you compress an image using Photoshop, you can try different formats, quality levels, resolutions, width and height sizes, and more to get the optimal settings for your compression. Before exporting the compressed image, you can use various functions to edit it and optimize its overall quality. In some cases, you can choose to crop the picture to reduce the file size losslessly.
Part 4. FAQs on How to Compress an Image on Mac
Question 1. Can I reduce the size of a photo in Mac Mail?
No, the Mail application on your Mac doesn’t have a built-in compression feature for you to directly reduce the size of an image. You need to resize and shrink the image size before attaching it to your email. You can select a preferred method from above to effectively compress your photos on a Mac. That can help to get a faster delivery speed.
Question 2. What is the best tool to compress photos on a Mac?
There are many specially-designed online image compressors, and powerful desktop image editors can help you reduce the file size of your Mac photos. If you prefer a free compression tool, you can start with some popular online image compressors like Picwand Image Compressor, TinyJPG, and Fotor. If you need a powerful image editor that carries the related compression function, try using the professional Adobe Photoshop. You can select the best tool to compress photos on a Mac, depending on your specific needs.
Question 3. How do you compress all photos in a folder on a Mac?
When you need to shrink the file size of an entire folder on your Mac, you can locate the folder in Finder, right-click it, and select the Compress option. That will create a compressed .zip file containing all the photos. Also, you can rely on some associated third-party apps to compress all photos in a folder.
Summary
This post shares three effective methods to compress photos on a Mac. You can first try using the built-in Preview to adjust the image size and make it smaller. For important images that need to maintain their original quality, lossless compression techniques can be used. If you want to reduce the file size of your Mac pictures without compromising quality, just turn to the AI-powered Online Image Compressor.
AI Picwand - Anyone Can be A Magician


